Sunday, 10 September 2017

The Master Bedroom

Hey everyone!

I'm so happy to finally say that our master bedroom revamp has been completed (wahoo). My OH has worked tirelessly and he's done an amazing job! He's such a perfectionist and I think it definitely shows in what he's achieved.

The last post I did about the bedroom revamp was on the 29th July (2017) and we'd just started to remove a stud wall to get rid of the 5th bedroom and to make both the bathroom and the master bedroom bigger. 

A new stud wall, the room replastered, new skirting boards, a new door architrave, the room painted, wallpapered, a new windowsill, new carpet and a tonne of new sockets and light switches and the bedroom is completed (donations welcome!) haha joking aside, we're definitely having a little bit of a break from housey jobs for now so we can replenish our wallets.

So here is our amazing new bedroom! 


It's such a wonderful feeling to be in this little room of bliss. It feels like I'm in a completely different house and I can shut the door on the rest of the unslightly decor we are yet to tackle.

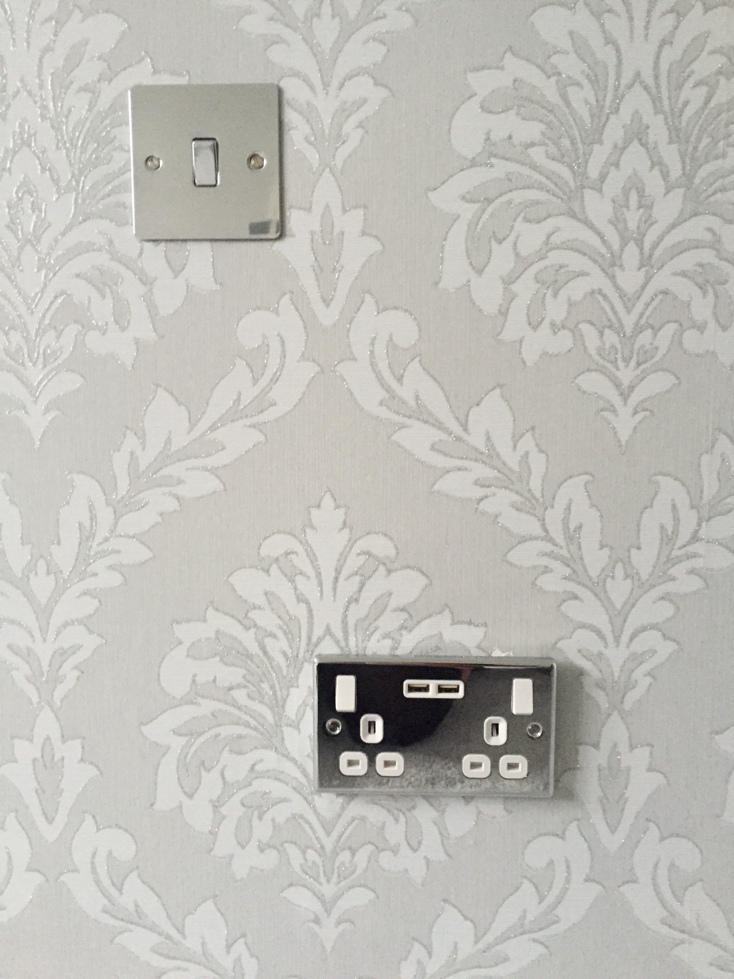
Here are a few close ups for you and links to where you can purchase things;


I'm starting with the wallpaper... although it looks gorgeous and I absolutely love it, it was a massive pain to put up. The issue was that the white pattern is outlined by a plasticy glitter which is a nightmare to cut through. When you try to cut through it, it just rips the paper! It took so much tidying up and caulking around the top to make it look as neat as it does. My OH has wallpapered so many times and he said it's the worst paper he's ever had to put up. 

Nonetheless, it looks beautiful now that it's up and my OH did a great job at salvaging it! 


The next thing I want to share with you is my amazing carpet! This was purchased from Carpet Right. 


It's a high pile carpet and just feels amazing under your feet! 

This is the colour and number etc 


We've also installed a UPVC windowsill cover over the original windowsill. This was purchased online and is cut to size. It's looks much cleaner!


With my OH being electrically trained, we decided to be a little snazzy with our sockets. He's installed these lovely chrome USB sockets which I love! 

He's also installed a light switch above the USB socket at my side of the bed so that I can turn the bedroom light on and off whilst in bed (lazy I know but never mind)! 


Speaking of lights... my absolute favourite light fitting has been installed into the master bedroom. This light was from NEXT and was in my lounge in my new build but this time I wanted it in our bedroom so that o have an excuse for buying a new light for the lounge! 

Here's the link to purchase this beauty... 


Our initial candles are from Next and they smell amazing (white jasmine).

Here's where to get them: http://www.next.co.uk/g213124s3#959682

Our curtains are from Dunelm and are the Solar Blackout curtains in the colour Grey.

Here's where to get them:

Well I hope you all love our bedroom as much as we do! We're definitely having a little break from house renovations (big ones anyway) until after Christmas. 

I'll still be on the look out for extra pieces to add to the room so if any businesses would like to get involved then please get in tough.

Thank you for reading, any questions then please just ask. I read all the comments! 

Doll xoxo

Saturday, 19 August 2017

The beginning of our kitchen revamp

As you all know, we've recently moved into our forever home and its definitely a project for us! The house itself is completely liveable but there's so much we want to change and improve to make it our own.

Our first job has been to update the kitchen, we're not going to replace and install a new kitchen any time soon so we're going to embrace the current kitchen and see what we can make of it.

The house was previously lived in by a family of 7! So as you can imagine, it's very well lived in and quite simply grubby. They left us a grey sofa in the kitchen which we have kept and you'll see it in lots of our pictures.

Here are some pictures of the kitchen as it was when we moved in...


The previous family were quite big fans of loud and colourful walls which isn't really our cup of tea... this was the feature wall in the dining area of the kitchen.


As well as changing the feature wall, we knew we were going to repaint the kitchen to freshen it up.


We've chosen to paint the walls in Valspar 'Clotted Cream' which can be mixed and purchased from B&Q.


This is the colour card in comparison to Dulux 'Timeless'


The first thing we wanted to do was change the feature wall in the dining area of our kitchen, we replaced the colourful floral paper with this;


Here you can find the wallpaper we used!-----
http://www.diy.com/departments/cream-gold-effect-grandeur-wallpaper/1478072_BQ.prd?New_WP_LF_Cream

I just love how clean and refreshing it looks! It's totally changed the feel of the kitchen and was great for £12 per roll.


We've also decided to change the door handles to update the look of the kitchen cupboards.
 
 
These handles are T bar in brushed nickel and were purchased from B&Q.
 
Another thing I really wasn't keen on was all the beech! The kitchen itself is pretty timeless but the beech trims on the units just made it feel old fashioned and cheap.
 
 
You can all probably agree it doesn't look great!


So here is a close up of some of the units.
We wanted to remove the beech trim that runs
along the top.


It was pretty weird seeing it without the trim!
The trims just simply unscrewed so it literally was a 5 minute job.
 
 
Unfortunately we couldn't remove the beech trim that runs along the bottom of the units as they were put on with the tiles so it would ruin them and we're not looking into replacing the tiles... yet! We decided to paint the bottom trim to match the colour of the unit instead.


To do this we took a cupboard door into B&Q and had it scanned to get a colour match. We then had the colour mixed in Valspar mid sheen. We paid £15 for our tin.                                                                  
To paint the trim we firstly sanded them to take off the plasticy feel and make them rough. We then literally painted them giving them three coats and this was the result which I must say I'm very happy with!
 
So with the beech trims gone, we decided to paint the beech plinths sitting underneath the kitchen units. Again we did this the same way we'd painted the trims.
 
Once we'd painted the plinths, we added some LED strip lights underneath the cabinets. We bought 3m of strip lights from Screw Fix for £25 and attached them to the underneath of the units.
 
This quick, simple and relatively cheap update to our kitchen has really made a big difference. We're now only left with beech work tops and the kitchen just feels a lot more up to date. We've still got a long way to go with the kitchen including wooden blinds, boxing in ugly fuse boxes and changing the tiles but I feel so much better about it!
 
Here is our updated kitchen during the day


Here is our updated kitchen at night
 
 
Our dining area of the kitchen is looking good, I'm very happy with it!
 
 
As the kitchen updates keep on happening, I will keep you all updated. If anyone has any suggestions as to what tiles you would add to the kitchen, let me know! :)
 
Thank you for reading
 
Doll xoxo


Saturday, 29 July 2017

Living on a building site...

Ok so the title of this post may be a little dramatic but the upstairs of our house is like a building site! It's so not Instagram worthy but I have shown some little clips on my story of the progress we've made.

When we bought the house, it was advertised as having 5 bedrooms... it doesn't have 5 bedrooms. When the house was built, the master bedroom had an en suite but when the previous family welcomed baby no 5, they needed an additional bedroom. They decided to knock out the en suite, pinch more room from the master bedroom and in theory create a 5th bedroom. It wasn't big enough to be classed as a bedroom and it was literally a 'Nursery'. We knew we'd want to be changing that ASAP as we have no need for a nursery and also we didn't like how small the main bathroom for the house was.

Here's a floor plan of the house (when we bought it)... please note that the window in bedroom 5 isn't as big as its portrayed on here!


As you can see, the '5th Bedroom' is absolutely tiny! As is the bathroom if you ask me. We toyed with the idea of putting in an en suite again (but then having to live with a small bathroom) or whether we just made the bathroom bigger. Obviously at the minute, there is only the two of us living in the house so having one bathroom is no problem at all. We do have a downstairs loo which is useful though!

We asked a few people (mainly families) what their opinions were on having an en suite or whether it's been an issue once there's little ones in the house and they all honestly said that as long as you have more than one toilet, there's no massive issue only having one main bathroom. It helped us make up our minds that we were just going to extend the main bathroom and have no en suite.

Here is a picture of the 'Nursery'


Here is our current tiny bathroom!


Here is a floor plan of what the house will look like once we've completed the bathroom and bedroom work

You can now see that the window that was in bedroom 5 isn't really that big as it would spread across two rooms!

So we've taken the wall (that was in bedroom 2) back to create the new boundary for the bathroom and we've also removed the bathroom wall to open it up into the 'Nursery' (bedroom 5).

This will make what was advertised as 'Bedroom 2' back into the master bedroom and it will be a really good size! It also means that we can have a separate walk in shower in the main bathroom which I'm excited about.


This is our progress so far...


This was the original stud wall for the 'Nursery'


We then started to knock through the bathroom wall to open it up


Next up came the floorboards!


From standing in the bath, all of the bathroom and nursery into the master bedroom was open


The new stud wall has been put up and it is being plaster boarded as I type!
 
 
My OH has done all of this work on his own! Granted it's taking longer than it normally would but the only thing we've had to pay for is the new timer for the stud wall so we're definitely saving lots of £££.
 
I can't wait to update you all on what happens next, I think it may be getting the master bedroom sorted out and then perhaps installing the new bathroom after Christmas.
 
Thanks for reading!
 
Doll xoxo


Thursday, 8 June 2017

Got my gleam on!

Absolutely loving my highlight today so needed to share with you all!

I purchased this Rimmel Good To Glow Illuminator in the colour 001 a while back from Boots as I was looking for a more intense highlight and thought this would do the trick!


I apply this liquid product using my beauty blender (in a dabbing motion on the skin) to the tip of my nose, cupids bow and my cheek bones. It does give a nice natural highlight however natural isn't really in my vocabulary when I'm going all out with my highlight!

I also own this MAC highlighting powder in the colour Double Gleam which comes in at £24.50. Again, this gives quite a nice highlight when used alone....... BUT combine the two together and it's to die for (I think)!


This is the highlight on my cheek bone created using the Rimmel Good To Glow as a base and the MAC Double Gleam on top.

Sunday, 4 June 2017

Ariana nails 💅🏻

Hey everyone,

We've all been affected by the recent Manchester  bombing at the Ariana Grande concert. My nail technician was at the concert with her daughter and thankfully they escaped unharmed.

There has now been a charity set up to help those who have been affected, the families and the ones who sadly lost their lives.

My nail technician is donating money for every person who has the Ariana bow painted on their nails.

Here's mine,


Doll xoxo

Friday, 19 May 2017

Summery Chicken & Sweet Potato

Hey everyone, I've had a few of you asking how I made this evening's dinner which is a weight watcher's recipe so here is the recipe for all of you.

Ingredients

  • Fry light
  • 2x chicken breast
  • Red pepper 
  • 1/2 onion 
  • 200g Cherry tomatoes (halved)
  • 50g Half fat crème fraiche
  • 1tbsp Italian Pesto
  • Basil
  • 1 medium sweet potato

1. Chop 1 sweet potato into small cubes and season to taste. Put into baking tray and place into a pre heated oven at 180 degrees (fan) for 45 minutes or until cooked and crisp.


2. Spray a frying pan with fry light and season chicken breasts then add to the pan. Cook for 20-25 minutes, turning frequently to ensure chicken is cooked through.


Add 1/2 onion and a red pepper (cut into small pieces) and add to the frying pan with chicken. 

3. Add the cherry tomatoes to the pan and cook for another 2-3 minutes. Add the crème fraiche and pesto, season to taste.


4. Add sweet potato to mix 


Serve immediately with fresh basil leaves & spinach.

Serves 2

Total SP 15sp

SP per portion 8sp

Mother's day cake

After completing my 'beginners cake decorating course' I couldn't wait to try out my new skills and with mother's day approaching I seized the opportunity.
 
I took to the internet to find some inspiration and went for a cute blue cake with flower and leaf decoration.
 
Here is what I created (I was super proud!) I cut all of the leaves by hand using a small knife which also meant I could add the detail onto the leaves. For the flowers I used a flower cutter (you can get these super cheap off ebay).


Doll xoxo